Blog
Guide on How to Position and Arrange Downlights
Downlights have quickly become a favourite within modern homes. Its simplistic and streamlined design sits flush with its surrounding environment, allowing it to blend in with its surroundings. Because of this, they have become extremely popular in new homes and modern renovations.
Using downlights, in conjunction with other lighting sources, creates an ambience and brightness to your space while saving energy, money and space. Downlights are available in various colours, tones, hues and brightness levels, allowing you to create whatever feel you wish within your space.
Downlights fulfil three key functions of interior lighting. These being to:
- Enable localised tasks
- Create ambience
- Illuminate the space
However, understanding the best way to position and arrange downlights, as well as when and where to use them, is a critical step in creating your ideal space. If done incorrectly, your home can quickly feel like a display studio, or furniture store, taking the focus away from the beautiful space you have created and placing it on lights that are supposed to be invisible.
If you are considering implementing downlights in your space but are unsure of how to go about it, we’ll outline everything you need to know in this article.
Halogen vs LED
As you may know, there are two common options available for downlights: LED or halogen lights. Understanding what these two types are and the different attributes and factors of each can help you make an informed decision on what best suits your project.
First, let’s look at halogens. Halogen bulbs are great for creating ambience within a space. They instantly create light, are dimmable and tend to emit a warm light that casts in all directions. Additionally, they accurately reveal the colour of furnishings, which may be an aspect that you may be looking for.
However, halogen bulbs emit a lot of heat, which not only can be quite uncomfortable to sit beneath but can also become a dangerous hazard. Halogen lights can burn if touched whilst on or become a fire hazard. Additionally, halogen bulbs require some form of shielding, as they can shatter in some instances. So, although halogen bulbs may have some aesthetic benefits, they pose a greater safety risk than LED bulbs.
LED bulbs are the safest and the most economical option of the two. With a lifespan of over 30,000 hours, which is ten times that of a halogen bulb, they are also incredibly energy-efficient, which means significant savings on electrical bills.
They are also a prime choice if you wish to avoid light damage to paintings, as they do not produce heat or UV radiation, making them safe to touch, even when switched on. Additionally, LEDs are relatively robust in compassion to halogens that are very sensitive and, thus, more likely to withstand necessary handling.
Lumens: What are they, and how many are necessary?
Traditionally, the brightness of a bulb has been measured in watts (W). This is because the brightness of an incandescent bulb was directly related to its power consumption. However, for downlights, this is not the case.
An appropriate and more accurate term to describe a bulb’s brightness is the lumen (lm). The quantity of lumens indicates the total amount of visible light emitted from a light source. Furthermore, another unit that is often used is lux (lx), which measures the concentration of the brightness, where one lux is equal to one lumen per square metre.
The lumens required to illuminate a space adequately are dependent on several different factors, including:
- The size and shape of the room
- The demands and needs of the room
- The height of the ceiling
- The colour of the walls, floors and furnishings
For example, a hallway that requires enough sufficient light to allow its inhabitants to see clearly and pass through easily would need approximately 300lm in total.
Planning the layout of your downlights
Understanding how to create the best layout for the downlights in your space is integral to achieving the best results to suit your ideal space. Downlights can be used singularly or in pairs to create a focal point and shed light on a specific spot within a room, or multiple downlights may be installed to illuminate an entire room. Knowing how many lights you’ll need and where to position them requires careful consideration to achieve your desired result.
A good rule of thumb is to allocate one downlight for every 1.2 m2 to achieve high lighting levels. To best understand how many downlights you require, you must first consider all aspects of the space, from the room’s décor and furniture to the desired aesthetic and intended usage of the lighting.
Here are some of the key points to consider.
Focal Points
First, you must determine what areas of the room require more light than others, and deal with these areas before anything else. If you are planning a lighting scheme for a kitchen, your starting point should be above the workspaces, such as the benches, stove and sink. Once the downlights for these areas have been arranged, the remaining downlights can be distributed around them.
Ceiling edges
The position of downlights on your ceiling is vital in creating a bright and inviting space. Placing downlights too close to a wall creates shadows around the edge of the ceiling, making the space appear small, crowded and a little gloomy. Avoid this by ensuring a gap of approximately 75cm between the downlights and the edge of your ceiling. This will allow light to spread and illuminate the entire room, creating a well light and spacious appearance.
Ceiling height
Light emits from a recessed downlight downwards in the shape of a cone. Ideally, these light cones should intersect approximately 75cm above the floor, thus meaning a higher ceiling does not require additional downlights to produce a suitable pool of light. However, the individual bulbs must be powerful enough to produce sufficient brightness to the floor.
A common method is to calculate the spacing between downlights by dividing the height of the ceiling by two and using the result as the separation distance. Your final decision will also take into account other factors such as the room’s shape, décor and the number and size of windows.
The room’s function
The intended function and use of the room is an essential factor when considering a light scheme. Its function dictates the position of any focal points and the overall level of brightness that the space requires. LEDs are perfect for this function as, unlike traditional lighting schemes, they can be strategically placed to create a lighting solution tailored specifically to the functions of the space.
Dimming
Installing dimmable downlights gives you added control over your lighting, allowing you to adjust your light levels to best suit your needs. Implementing dimmable downlights enables you to install downlights with high light levels that can be manually reduced as required, creating flexibility and ease of use rather than attempting to create a single ideal permanent light level. Select a trailing edge rather than a leading-edge dimmer to avoid buzzing and possible damage to the bulbs themselves.
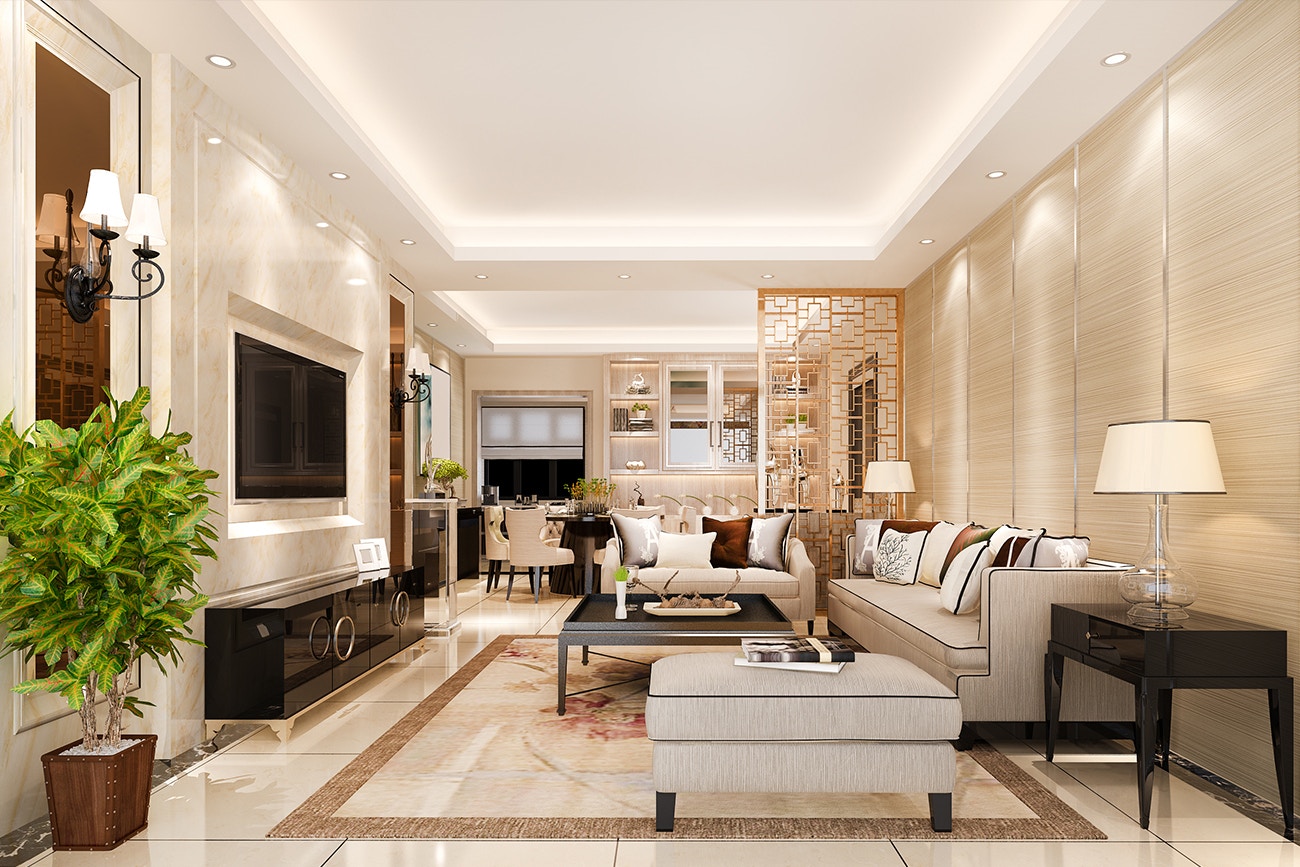
Placing downlights in the living room

The living area is the main communal space of a home. It’s where we sit down to unwind and entertain, whether by watching our favourite shows, relaxing with the family or spending time with friends. This room also tends to serve the purpose of displaying treasured ornaments, photographs and mementos.
That being said, the living room requires a lighting scheme that fulfils all of its needs and is flexible enough to accommodate its various activities.
How downlights are positioned can be used to bounce light off various surfaces, including walls, mirrors and architectural features, to give character to the living room. Strategically positioned downlights can create focal points and feature items within the space, such as art or photographs.
Utilising stylistic additions such as colour-variable bulbs enables you to change the atmosphere and ambience, and implementing dimmers helps create mood and accessibility within the room.
LED downlights are available with a range of beam angles, offering different light cones for different uses. Note that the wider the angle, the more floor space is illuminated. Ensure that you do not use widely spaced downlights with narrow cones; otherwise, you will create obvious and unattractive spots of light on the floor.
Furthermore, a narrow cone of light is ideal for task lighting, as it is focused on a point and will not encroach on other people in the room.
Placing downlights in the kitchen
Downlights serve an essential purpose in the kitchen. Downlights have quickly become a popular choice in kitchen designs as general and task lighting due to their flexibility and functionality. As the purpose of the kitchen has changed over time, so have its lighting demands.
The kitchen is now a place to gather and socialise, alongside its traditional purpose of preparing and cooking meals. It has quickly become the beating heart of the modern home and thus requires adequate lighting to meet its demands.
Positioning your downlights correctly in the kitchen is very important. Meal preparation requires bright, well-lit conditions, so ensure that you illuminate the cooking spaces properly, rather than the central spaces, such as in between counters or cupboards.
Get experts to position and arrange downlights
We hope this guide on how to position and arrange downlights within your space has been helpful. If you require further assistance, don’t hesitate to contact us for personalised guidance and direction in your lighting project.
Want to learn more about lighting design?
Download our lighting design brochure